
Poster Printer Information
NOTE: When starting a print job watch the printer, most problems such as cleaning, paper jam, and print error; occur at the beginning. Do not print above 50% humidity. 45% or lower is preferred. Do not forget to empty the dehumidifer if necessary. You can turn on the fan to speed up lowering the humidity and drying posters.
There are three kinds of paper used for the poster printer.
|
Name Used to Print |
Name Used to Order Paper |
Use |
Dry Time |
|
Premium Semimatte Photo Paper (260) |
36” by 100” MicroFLASH PhotoSatin |
Faculty Research Posters |
Depends on amount of ink, anywhere from 3 to 8 hours |
|
Plain Paper |
36” by 150” 20lb Mono InkJet Bond |
Department Use |
Comes off dry |
|
Presentation Paper Matte |
36" by 100" 36lb Coated Inkjet Matte Paper |
Undergraduate Research Posters |
Comes off dry |
Go to https://triage.as.uky.edu and login with your link blue credentials.
All poster printing requests are located under ‘General’. Open the ticket you want to print and download pdf under ‘Attachments’
NOTE: all posters need to be a PDF format, if they are not please tell the ticket submitter to submit a pdf version of the poster.
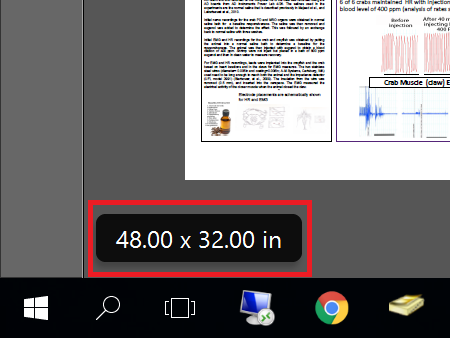
Open the pdf in Adobe Acrobat. If you scroll your mouse to the bottom left-hand corner the dimensions of the poster will appear.
Adobe displays length by height in this measurement. NOTE: One of the dimensions cannot be longer than 36” and the longest poster we are allowed to print is 72” long. This means the max poster dimension is 36” by 72”, the typical poster size is 36” by 48”.
Go to File -> Print -> Select ‘Poster Printer’ from drop down printer menu. Under ‘Page Sizing and Handling’, click ‘Actual Size
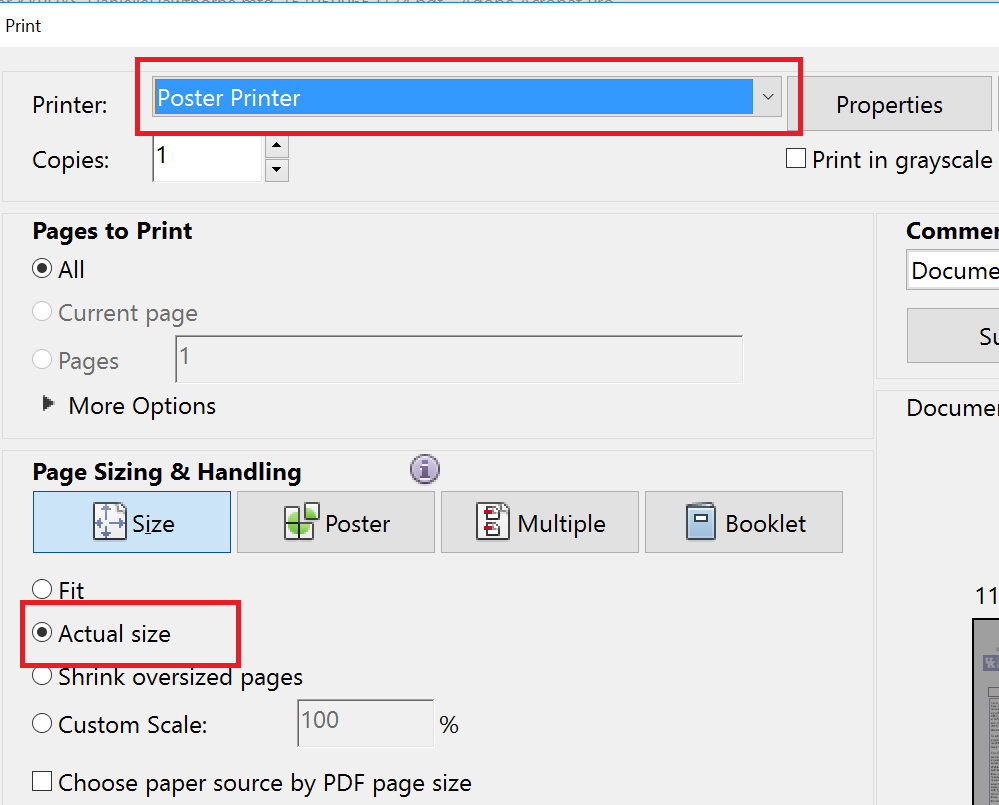
Then, click ‘Properties’ beside the drop down printer menu.
Check the ‘Media Settings’ and make sure they match the settings listed in the table below.
Faculty Research Posters
Media Type: Premium Semimatte Photo Paper (260)
Color: Color
Print Quality: Quality
Department Use
Media Type: Plain Paper
Color: Color
Print Quality: Speed
Undergraduate Research Posters
Media Type: Presentation Paper Matte
Color: Color
Print Quality: Quality
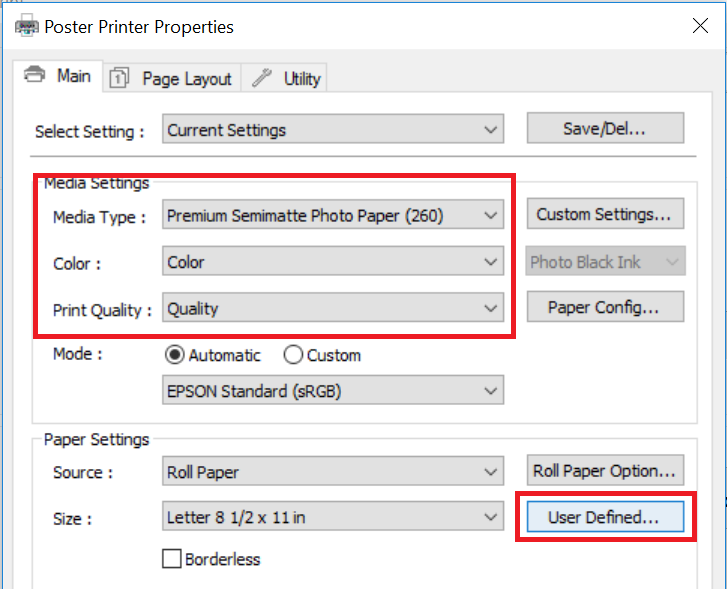
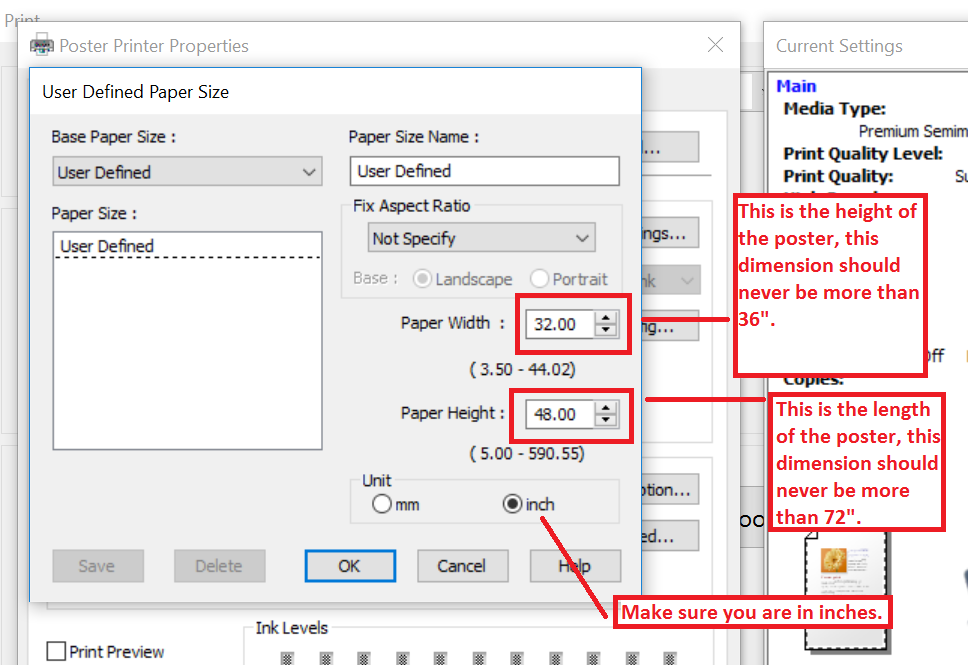
Click on ‘User Defined’ seen in the picture above. Set the dimensions of the poster found in step 3.
Put the height of the poster in the ‘Paper Width’ and the length in the ‘Paper Height’. Then, click ‘OK’ and ‘OK’ again.
You will now see the Print Preview of the poster. If the poster dimensions and the document dimensions are the same click Print
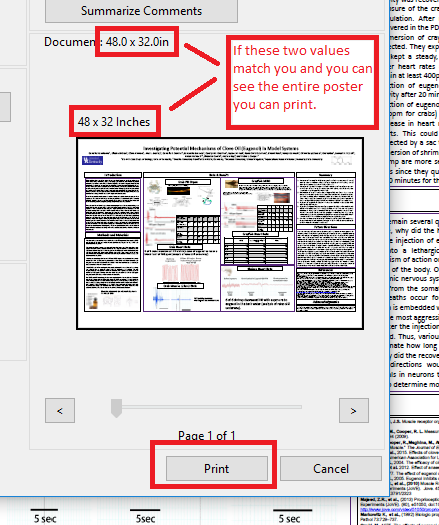
The printer will start printing the poster.
There are 3 metal rods on the top of the printing shelf, place them over the blue pieces of tape below the printer.
Watch for when the poster is about to finish printing.
Don't let the poster hit the floor. You can hang the poster above the printer using the line and binder clips or place the posters on the table in THM101F to dry. Once the poster is done and the ink is dry, there are rubber bands in THM101 to roll up the poster.
